
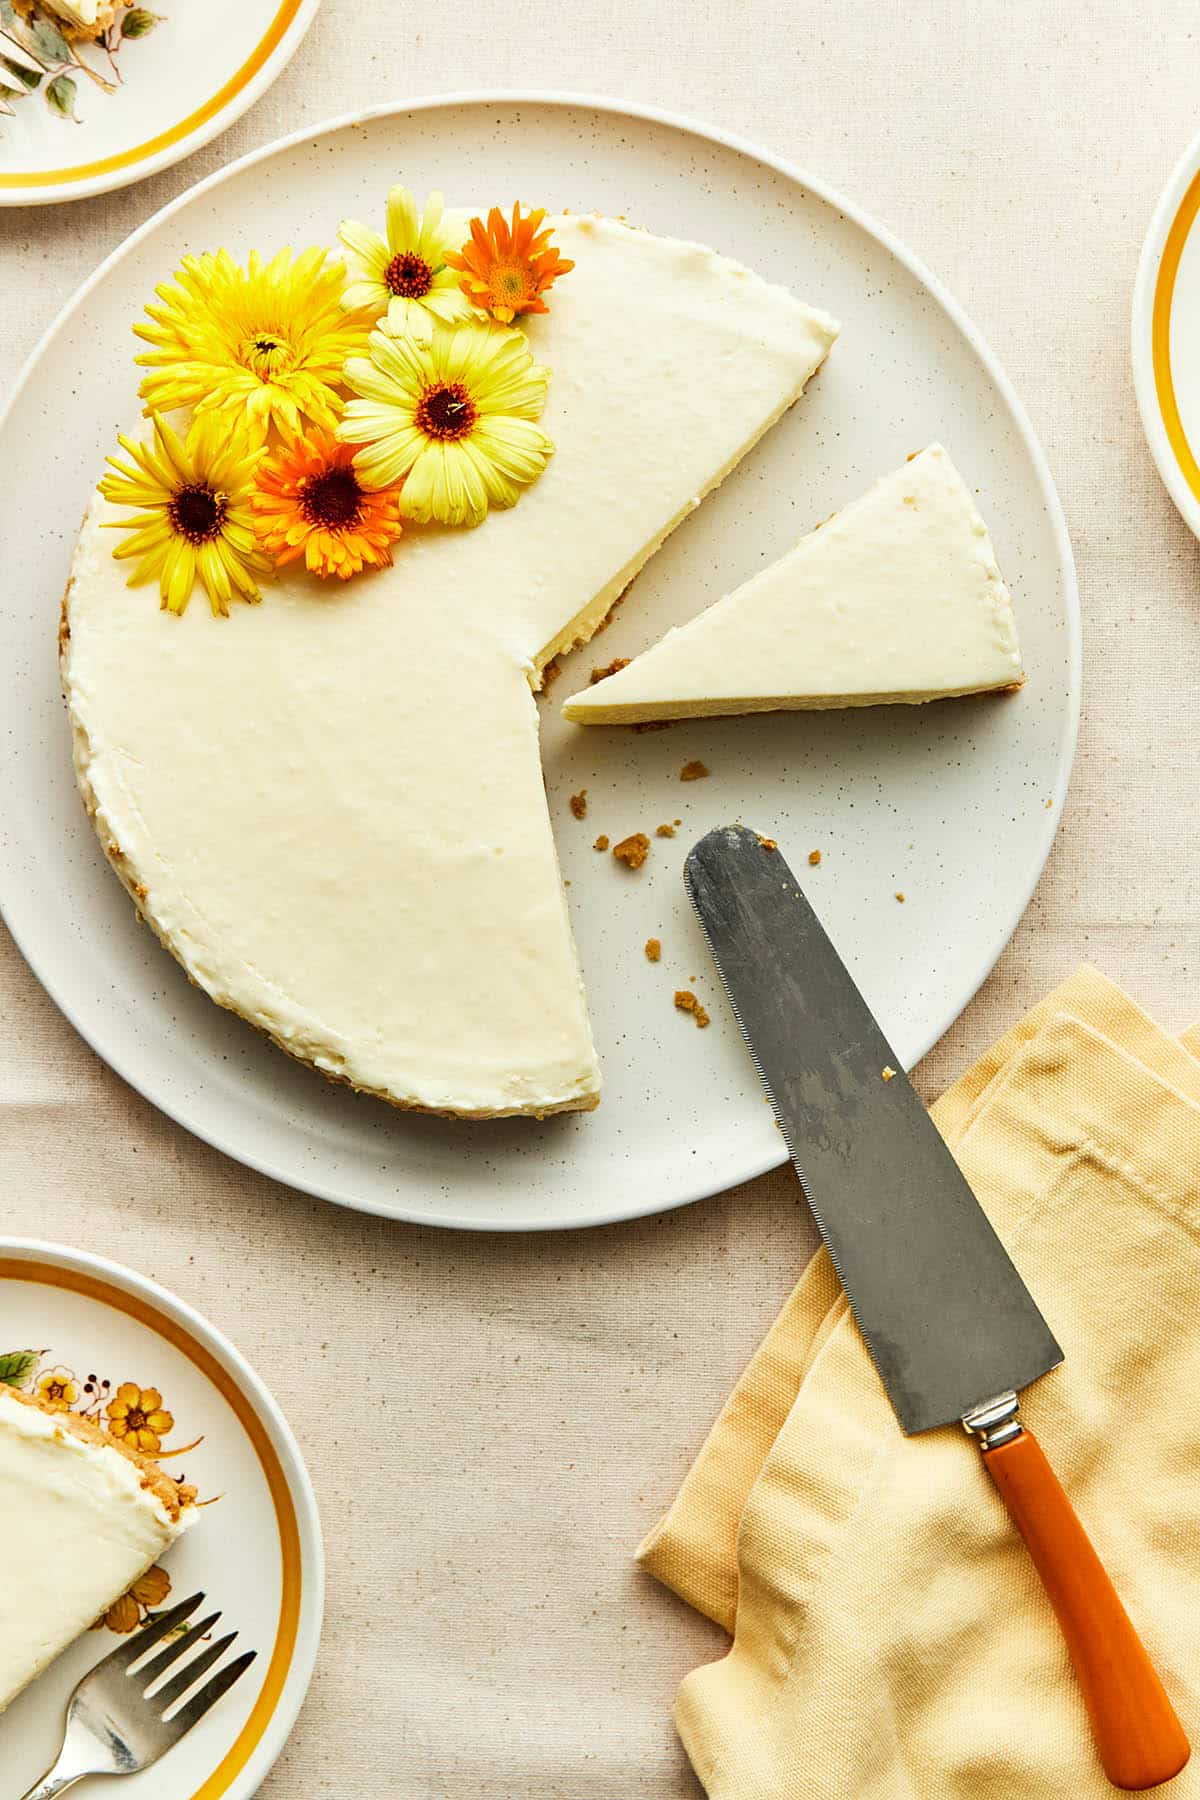
Rich and creamy, no-bake gluten-free cheesecake is a decadent treat that’s so easy to make. The best part? No need to turn on the oven! With just 6 ingredients, it's the simplest cheesecake ever and great to make with kids.
For some more you'd-never-know gluten-free desserts, try our old-fashioned peanut butter balls, white chocolate mousse, or any time of day gluten-free dutch baby.
Jump to:
Ingredients

Ingredient Notes and Substitutions
- Graham crackers: use any certified gluten-free graham crackers, or buy pre-crushed crumbs you like.
- Cream cheese: use any brand of cream cheese you like, but make sure that it's in blocks rather than the spreadable variety.
- Vanilla: clear vanilla is Kelly's preference, but any type of vanilla extract will be good here. Use pure vanilla for the best flavour.
- Sweetened condensed milk: not to be confused with evaporated milk, please make sure you're using sweetened condensed.
Method
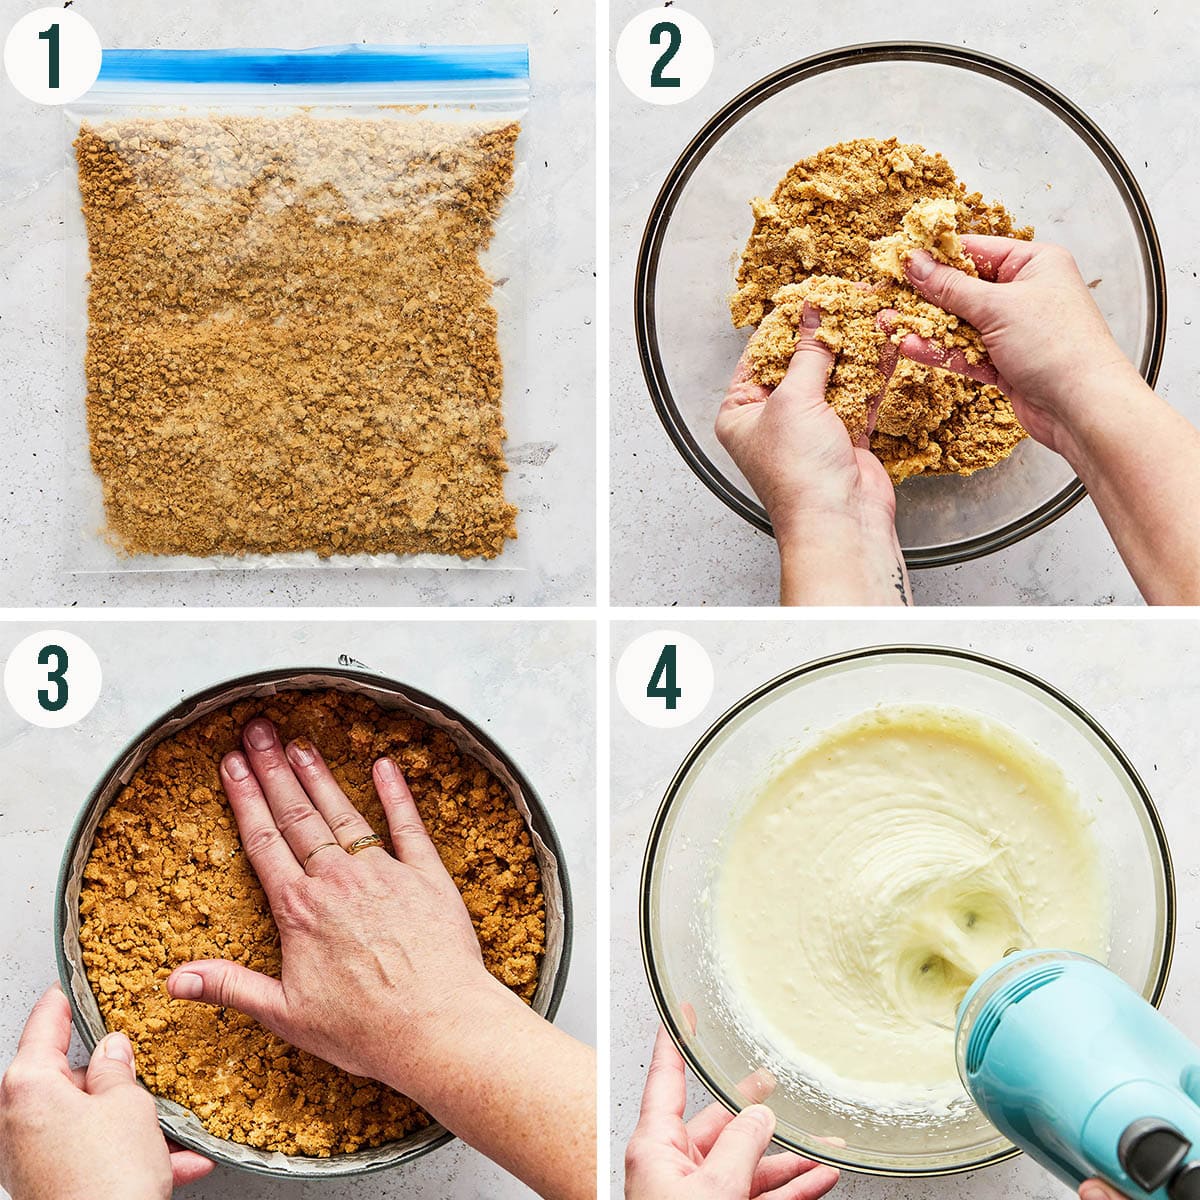
Step 1: crush the graham crackers into crumbs with a rolling pin or use a food processor.
Step 2: add the graham cracker crumbs, butter, and sugar to a bowl and use your hands to mix well.
Step 3: press the crumb mixture into the base of a prepared spring-form tin.
Step 4: beat the cream cheese, sweetened condensed milk, and vanilla together until smooth and creamy.
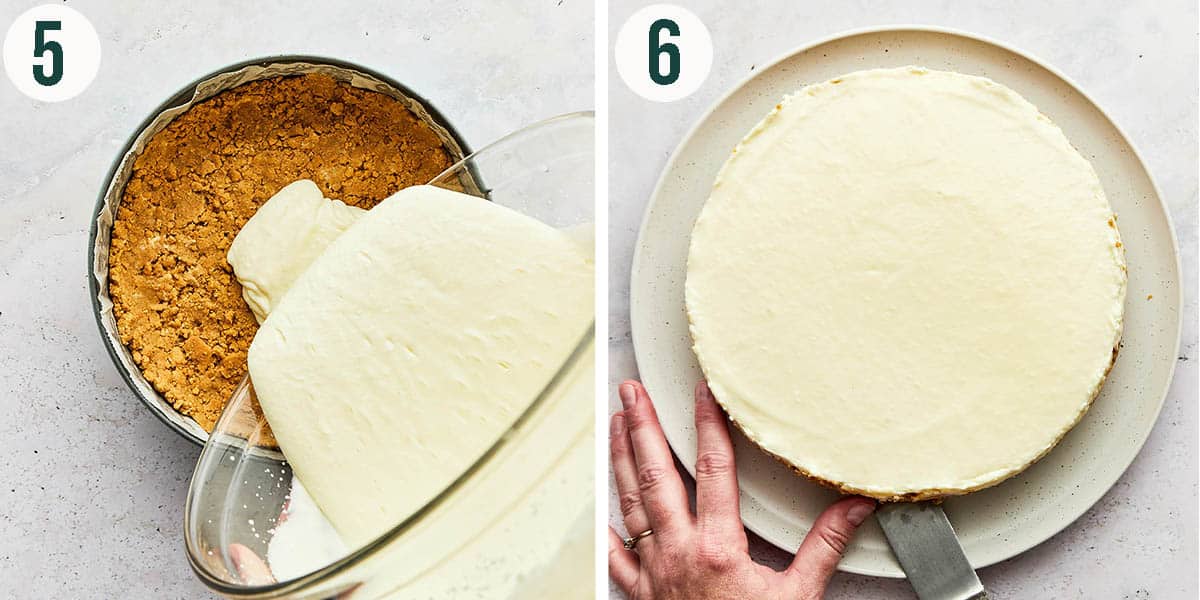
Step 5: pour the cream cheese mixture over the graham cracker base.
Step 6: let the cheesecake set in the fridge overnight, then carefully remove from the tin and place onto a serving plate. Serve chilled.
Top Tips
- Use solid butter: use room temperature butter for a sturdier crust. Melted butter tends to make graham or other cookie crumbs soggy and doesn't re-harden in the fridge the same way unmelted butter does.
- Make it less sweet: if you like your cheesecake tangier than the flavour of straight up cream cheese, add up to ¼ cup (60 ml) of lemon juice to the filling.
- Use a food processor: if you prefer a very fine texture for the biscuit base, mix the graham crackers in a food processor instead of crushing them by hand. The mix of bigger pieces from crushing it with a rolling pin adds a nice textural variation, so keep that in mind.
Recipe Notes
We recommend using a springform pan for this recipe because it's the easiest way to transfer the cheesecake to a serving plate. If you don't own a springform, make the recipe in an 8-inch (20-cm) round, or 9-inch (23-cm) square dish and serve it right from the dish.
Keep in mind when you make this recipe that a no-bake cheesecake still requires time to set. We recommend a minimum of six hours in the fridge, though overnight is best. The cheesecake will soften as it sits at room temperature so keep it refrigerated until ready to serve.
We haven't tested this recipe with dairy-free butter or cream cheese. Since these ingredients - especially the cheese - vary so much, you'd be better-off seeking out a specific vegan cheesecake recipe instead (try Sophie's cashew cheesecake).
How To Store
Cover the gluten-free cheesecake with a large plate or wrap loosely and store in the fridge. The cheesecake will keep, covered in the fridge, for up to five days. We don't recommend freezing it.
Add-ins and Variations
- Use fresh berries to decorate the top of the cheesecake. You can also fold them gently into the filling before pouring it into the crust.
- Mix fresh berries with a bit of sugar in a bowl. Let the berries sit until they have released their juice and dissolved the sugar into a syrup. Use as a topping for slices of cheesecake.
- Stir 1 cup (200g) of chocolate chips into the filling. Once set, drizzle the top of the cheesecake with melted chocolate.
- Swirl fruit compote, jam, or lemon curd into the filling before it sets.
- Add the zest of one lemon plus up to ¼ cup (63ml) of lemon juice to the filling. Fresh orange zest or juice would also be great.
- Top the cheesecake with caramel or butterscotch sauce.
- Or add anything else you think is delicious!
FAQ
What is no bake cheesecake filling made of?
The filling for no-bake cheesecake is usually made with cream cheese, sweetened condensed milk, and vanilla. Sometimes whipping cream or icing sugar will be added too.
Is no bake cheesecake as good as baked cheesecake?
It just depends on what you like more! A no-bake cheesecake is lighter, with a fluffy, airy texture. Baked cheesecake is dense and has a slightly more structured texture, but both are delicious.
Why is my no bake cheesecake sloppy?
If your cheesecake turns out too runny, it'll be due to not chilling long enough, changing the ingredients, or using warm cream cheese.

If you make this Gluten Free Cheesecake recipe or any other no-bake recipes on the Baked Collective, please take a moment to rate the recipe and leave a comment below. It’s such a help to others who want to try the recipe. For more baking, follow along on Instagram, TikTok, and YouTube.
Gluten-Free No Bake Cheesecake
Equipment
- 8-inch (20-cm) springform pan
- Parchment paper
- Rolling Pin
- Food processor optional
- Mixing bowl
- Stand or hand mixer
- Small offset spatula or the back of a soup spoon
- Measuring cups and spoons or a digital kitchen scale
Ingredients
For The Gluten-Free Cheesecake Crust
- 1 ½ cups gluten-free graham crackers or graham-cracker crumbs
- ⅓ cup butter room temperature, plus extra for the pan
- ¼ cup sugar
For The No-Bake Cheesecake Filling
- 2 8-ounce packages cream cheese softened
- 300 ml can sweetened condensed milk
- 1 teaspoon vanilla extract
Instructions
- Lightly grease an 8-inch (20-cm) springform pan with butter. Line the bottom and sides of the pan with parchment paper. Set aside.
- Start by making the crust. Place the gluten-free graham crackers in a large zipper top bag.
- Use a rolling pin to roll and crush the crackers into fine crumbs with some larger chunks. You can use a food processor if you would rather, but we like the crumbs to be less uniform in size to add more texture to the crust.
- Add the crushed graham cracker crumbs, butter, and sugar to a mixing bowl. Use your hands to work the butter and sugar into the graham crumbs until well combined.
- Dump the crumb mixture into the prepared springform pan.
- Use your hands to spread and press the crumbs into and even layer over the bottom and slightly up the sides of the tin. Place the tin in the fridge.
- Next, make the filling. Add the cream cheese, sweetened condensed milk, and vanilla to a mixing bowl.
- Use a handheld or stand mixer to beat the cream cheese mixture until smooth and creamy. If there are lumps in your cheesecake filling, your cream cheese may be too cool. You can place the mixing bowl in the microwave (as long as it isn’t metal) and heat the mixture in ten second bursts.
- Continue to beat the cream cheese in between heating until the mixture is smooth and lump-free.
- Remove the crust from the fridge and pour the filling in on top of it. Use a small offset spatula or the back of a soup spoon to smooth the mixture evenly inside the tin.
- Place the cheesecake in the fridge to set for at least six hours before slicing, though overnight is best.